

Treat main chat as the project’s full record, and treat each chat window as the place to continue a specific task. Windows only show their own messages: a message sent in window A does not appear in window B. To see every window at once, open main chat.
Continue a task in its chat window. Use main chat to see how the project is progressing overall.
Create a chat window
After you open a project, create a window from one of two entries, depending on whether any chat windows already exist.Entry 1: the new-chat icon next to the project name
If the project has no chat windows yet, a new-chat icon appears next to the project name. Click it to create a window. Use this entry the first time you create a window, or after you have deleted every chat window.
Entry 2: New chat in the … menu
Once the project already has a chat window, the icon next to the project name goes away. To create more windows:- Open the … menu in the chat area.
- Choose New chat.
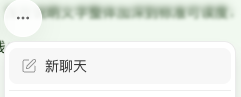 Then describe the work in that window’s input. Say what you want done and what must stay. For example:
I want to adjust the homepage. Keep the current sections, make the intro shorter, and emphasize the Book now button.
Switch and continue
When several chat windows exist, pick the one to continue from ….- Open the … menu in the chat area.
- Choose the chat window you need.
- Review that window’s history.
- Add requirements in the input and continue.
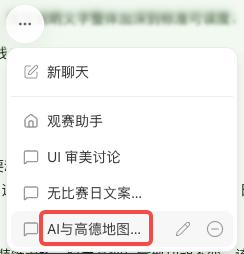 If you are only adding detail to the same work, go back to the original window. If homepage design already lives in one window, keep homepage button-copy changes in that window.
Close a chat window
Closing and deleting are different. After you close a window, reopen it from …. Closing does not make the window unrecoverable the way delete does.- Click × to the right of the current window name.
- Open the … menu in the chat area.
- Find the closed window and reopen it.
Rename a window
Give a window a name you can recognize later, such as Homepage design or Membership. You can rename it in two places:In the current window
- Open the window.
- Hover the window name.
- Click the name, type the new name, and confirm.

From the menu
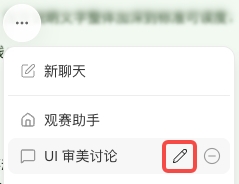
- Open the … menu in the chat area.
- Hover the window you want to rename; an edit icon appears on the right.
- Click the edit icon, type the new name, and confirm.
When superun names a window for you
If you have not renamed a new window yourself, after you send the first message to start a task, superun generates a name from that task when the task finishes. You can still rename it afterward from either entry above.Delete a chat window
To remove a window you no longer need, delete it from …:- Open the … menu in the chat area.
- Hover the window; a delete icon appears on the right.
- Click the delete icon. A confirmation dialog opens.
- Confirm you have the right window, then delete.
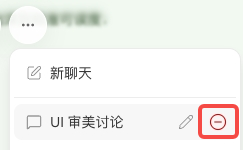 Deleting a chat window does not delete or stop the related task. A running task keeps running.
Open main chat
Main chat shows every message from every collaborator and every chat window in the project. Use it when you want to see what people are discussing or to read the full record.Where to find it
Open the … menu in the chat area and choose the item that matches the project name. If the project is called Observation assistant, Observation assistant in the menu is main chat.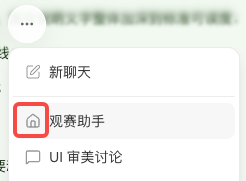
Why the input is locked
After the project has any chat window, switching to main chat locks the input by default and shows an unlock prompt. That keeps follow-up work in the matching window so one topic stays together and is easier to find later. When you see the prompt you can:- Continue existing work: return to the matching chat window from …, then send.
- Start new work: click New session to create a chat window.
- Send in main chat anyway: click Unlock, then use the input.
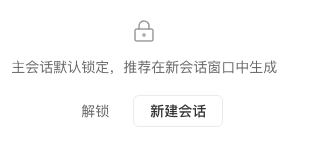
Messages sent from the main-chat input are not filed into any chat window. You can only see them in main chat. Prefer going back to the matching window to continue a task.
When to use it
Suggested workflow
One window, one clear goal
Keep the same work in the same window. Return there to add detail; create a new window when the work is different. For example, while building a booking site:- Create a window for homepage layout, intro copy, and the booking entry.
- Create another window for membership signup and profile.
- When you later tweak the homepage, go back to the homepage window.
- To read the full discussion, open main chat.
In a new chat, state the goal and constraints first
Say which page or feature to change, what success looks like, and what to keep. Attach reference images or files in the same message if you have them. Concrete instructions such as “make the homepage booking button blue and keep its place” are easier to follow than “change it like we said before.”Scan progress in main chat, then continue in the matching window
Main chat is for reading. After you find the work to continue, switch to that chat window before you send the next message, so the full thread stays in one place.Notes
- Every chat window belongs to the same project. For a separate copy of the project, use Project copy.
- Main chat shows messages from every collaborator and every chat window.
- Each chat window only shows its own messages. A message sent in one window does not appear in the others.
- After you create a chat window, the main-chat input is locked by default. To continue a task, switch back to the matching window.
- Messages sent from the main-chat input are not filed into any chat window and can only be viewed in main chat.
- Check which window you are in before you send, so follow-ups do not land in another topic.
- Deleted chat windows cannot be restored. Check before you confirm.
- Deleting a chat window does not delete or stop the related task. Running tasks keep running.
FAQ
Does creating a chat window create a new project?
Does creating a chat window create a new project?
No. A new chat window starts another conversation in the current project. To create a new project from an existing one, use Project copy.
Where is main chat?
Where is main chat?
Open the … menu in the chat area and choose the item that matches the project name.
Where can I see other collaborators' and other windows' messages?
Where can I see other collaborators' and other windows' messages?
Open main chat to see every message from every collaborator and every chat window in the project.
Why is the main-chat input locked?
Why is the main-chat input locked?
After you create a chat window, main chat locks the input by default so you continue in the matching window. You can switch back, or click New session to start a new chat. To send in main chat anyway, click Unlock.
Why can't I find the message I just sent in a chat window?
Why can't I find the message I just sent in a chat window?
Check where it was sent:
To continue that discussion, go back to the window where you sent it. To search the whole project, open main chat.
Why did the window name change by itself?
Why did the window name change by itself?
If you never renamed a new window, superun generates a name from the first task after that task finishes. You can still click the current name, or use the edit icon in …, to rename it yourself.
Can I restore a deleted chat window?
Can I restore a deleted chat window?
No. Delete shows a confirmation dialog; after you confirm, it cannot be restored.
Does deleting a chat window stop a running task?
Does deleting a chat window stop a running task?
No. Deleting a window does not delete the related task or stop it. Running tasks keep running.
When should I create a new window vs continue the existing chat?
When should I create a new window vs continue the existing chat?
Create a new window when the work is different. Return to the original window when you are adding detail or continuing the same change.